Fixing that Car 101 – Flats (And I Don’t Mean the Buildings)

Photo Source: weirdnutdaily
Here you are, just getting in your car to drive home after a productive day. The roads are nice and clear, and you’re looking forward to a nice dinner. You drive off but realize that something isn’t quite right, your car isn’t handling as well as normal. Concerned, you pull over, switch on your hazard lights, and step out. Oh no! A dejected and deflated tire stares at you. You see the nail sticking out of it and realize that you’re gonna have to change it. Thinking hard, you can remember some small smattering of instruction from your driving class but it’s definitely not enough. Fear not! We’ve got you covered! Let’s take a look at how to change a flat car tire!
Failing to Plan is Planning to Fail
Before we even get to our hypothetical scene in the introduction, it pays to know that flat tires can happen at any time and at any place. Thus, it’s always good to be prepared! There are some tools that are included with your car upon purchase, and others that while not entirely necessary, are always good to have. Let’s see..
Items bundled with your vehicle:
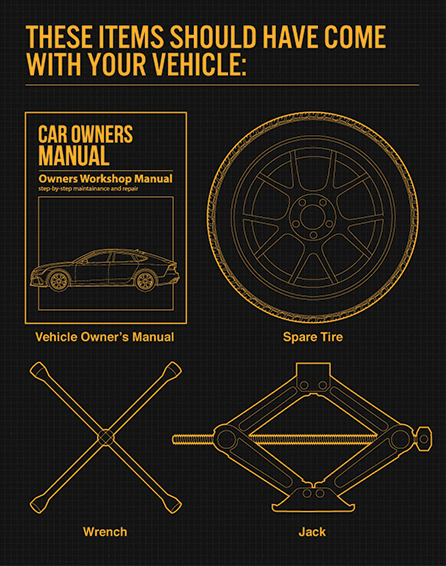
Photo Source: bridgestonetire
1. A spare tire. Very very very important. Always make sure your spare tire is inflated according to the manufacturer’s recommended pressure per square inch (PSI) that can be found in your car manual. When you check your other tires, be sure not to neglect your spare!
2. Lug wrench. No, it’s not an insult. The lug nuts are those metal bits that hold your tire in place. The lug wrench is what you use to loosen and tighten those lug nuts. Picture included.
3. Jack. To change your tire, you’re going to need to get the car off the ground. Unless you’re Mr. Incredible, the Hulk, or Superman (etc), Jack’s gonna be your best friend to do that.
If you’re missing any of these items, make sure you go buy a replacement NOW. Or at least, as soon as possible to prevent any more inconvenience.
Optional but very useful items:
Source: bridgestonetire
1. Waterproof flashlight with working batteries. You know, for the dark. When you can’t see anything.
2. Rain poncho. Ever tried holding an umbrella while trying to change a tire? Trust me, it isn’t fun. If it’s raining, this will save you some grief.
3. Small cut of wood (approximately 2 by 6 inches). Useful for securing your jack, or making sure your other tires don’t move accidentally.
4. Gloves. Those nuts can be tight and the tools hard on your hands. Save yourself some pain (literally) and get a good pair of thick gloves.
5. Hand cleaner and paper towels. For the successful but dirty car-tire changer when he/she is done.

Photo Source: amazon.com
6. Reflective triangles. The last thing you want is to get your car rammed from behind because another car couldn’t see you. Get a triangle. See below for more instructions.
Now that you’re prepared (Boy Scout motto), let’s take a look at doing the actual deed.
How to Change Your Car Tire
1. FIND A SAFE AND STABLE LOCATION. Never change a flat on an incline, because wheels are round and they roll. Along with your car. If necessary, drive on the flat till you find a stable and level surface. If you’re driving when you realize you have a flat, do NOT suddenly brake or turn. Slowly reduce your speed, turn on your hazard lights, and scan your surroundings for that safe and level location. Straight roads are preferable, with a wide shoulder so that others drivers can see you. Safety first, a busted rim is better than an accident. Also, make sure you have enough distance between you and oncoming traffic to work safely.

Photo Source: fosterwebmarketing
2. WARNINGS: HAZARD LIGHTS AND REFLECTIVE TRIANGLES. You should already have them on when you realize the flat but if not, make sure to switch them on now. Reflective triangles should be placed at some distance behind your vehicle to give other drivers ample warning.
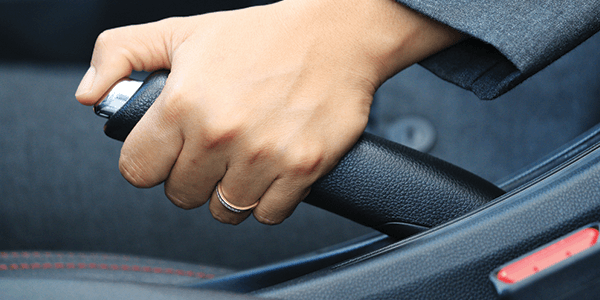
Photo Source: cloudfront
3. SECURING THE CAR. Set your parking brake/handbrake, put your vehicle in park (if driving an auto car). If you have the wood, bricks, or wheel wedges, use those to secure the diagonally opposite wheel from the flat is good to prevent the car rolling accidentally.

Photo Source: theblaze
4. GET YOUR SPARE TIRE INTO THE ACTION. Remove the spare tire, the jack, and the lug wrench. Most automobiles have them under a removable cover in the trunk/boot of the car. Bring them around to the side of the flat.
5. CHECK YOUR CAR MANUAL. Most cars are similar, but yours might have specific instructions. To prevent any accidents, always check or familiarize yourself with your car manual.

Photo Source: cdn
6. REMOVE HUB CAP OR WHEEL COVER. If your vehicle has a hubcap or wheel cover, removing it first makes life a lot easier before lifting the car with the jack. If the lug nuts are exposed, skip this step. Removing the hub cap is as simple as using the flat end of the lug wrench or any tool in your kit to pry the cover off.

Photo Source: whstatic
7. LOOSEN THE LUG NUTS. Get that lug wrench in there and loosen the nuts by turning counterclockwise. Don’t remove them completely, just loosen them to where they can be easily removed by hand. Doing this when the wheel is still on the ground is to ensure you’re turning the nut and not the entire wheel. Loosening the lug nuts can take quite a bit of force, if necessary, use your body weight carefully to provide enough force.

Photo Source: clublexus
8. GETTING YOUR JACK RIGHT. Most modern cars have molded plastic underneath the car that will break if the jack is used there. You want to get the jack firmly in place on one of the metal beams that make up the chassis. Some cars have a small notch or mark near the wheels where the jack is intended to go. Have a look before lifting! You can also check your car manual for the proper place to put the jack.
9. RAISING THE CAR. The jack should be raised until it is supporting but not yet lifting the vehicle. Check that the jack is firmly in place on the underside of the vehicle and that it is perpendicular to the ground. Once done, jack up the car to a height of about 6 inches off the ground. If you have a scissor jack, insert the rod or wrench and crank. If you’re using a hydraulic jack, place the handle in the appropriate location and pump using even, steady strokes. WARNING: NEVER PUT ANY PART OF YOUR BODY UNDER THE VEHICLE DURING OR AFTER RAISING THE JACK.
10. REMOVE THE FLAT TIRE. Unscrew the lug nuts the rest of the way by hand (put them somewhere safe) and remove the flat tire by gripping it by its treads and pulling it gently towards you until it’s completely free of the hub behind it. Make sure the flat tire is on its side so it doesn’t go on its own adventure. If you’re worried, placing it under the vehicle will help to reduce problems in the event of a jack failure.

Photo Source: cdn
11. REPLACE WITH SPARE TIRE. Make sure you’re putting the tire on the correct way and not backwards. Align the spare tire with the exposed lug bolts and push it into place. It should fit exactly as the flat tire did.
12. REPLACE THE LUG NUTS. Replace the lug nuts by hand but don’t tighten all the way yet until the vehicle is back on the ground. When tightening the lug nuts, use a star pattern where the first two lug nuts tightened should be diagonally opposite from one another, and the same with the last two (See picture below for sequence).
13. LOWER THE CAR AND FINISHING UP. Lower the jack carefully until the spare touches the ground. Use the wrench to tighten the lug nuts the rest of the way, again going in a star pattern (the next lug nut to be tightened should not be directly adjacent to the first). Put your weight into it, those lug nuts should be as tight as you can get them.
14. REPLACE THE HUB CAP. If you had one and took it off.
15. PACK YOUR TOOLS. Your flat tire might be too big to fit into the spare tire’s compartment so secure it either in your trunk or in the back seat. Make sure your other tools are retrieved and kept where they belong.
16. CHECK THE PRESSURE ON YOUR SPARE. Get to a petrol station to make sure your spare has enough pressure.
CAUTION: GET TO A TIRE SHOP ASAP. Your spare tire is precisely that. A spare. It’s not meant to be used for long distance driving and should not be driven at high speeds. Check your car manual for the appropriate instructions. As soon as possible, get to a mechanic and have them look at your flat tire to see if it can be repaired or needs to be replaced.

Photo Source: tireguides
And there you have it! How to change your tire should you ever need it. Some cars may have different configurations, for example 5-lug wheels instead of 4-lug wheels (See picture for sequence). Check your car manual for the proper tightening instructions to ensure even pressure across your tire. Drive safely and take care!